PiHoleMobile
Tutorial to create a mobile PiHole instance protected by a WireGuard VPN.
Mobile PiHole VPN - protected by WireGuard.
This is a (semi) comprehensive tutorial on how to setup WireGuard on Ubuntu, and then setup a basic PiHole server that only listens on the client WireGuard subnet. This guide expects you to have moderate experience with any Linux distro, particularly Ubuntu, and also to have a basic understanding of what PiHole and WireGuard do and how they work. This guide is up to date as of 01/17/2021, and is written with the expectation of using Ubuntu 20.04 and the to-date versions of WireGuard and PiHole. I have tried to abstract this enough so that this could be used on other distros.
First things first - get yourself a VPS. I’ve used Digital Ocean for years, but any provider that gives you root access should do. I’m currently using their cheapest offering, with 1 core and 1GB of RAM. Performance has not been an issue for me, but I’ve never had more than three devices on it simultaneously.
Installing PiHole
After doing the initial install of Ubuntu, and updating all packages, jump into the root user and install PiHole using this command:
curl -sSL https://install.pi-hole.net | bash
(obtained from https://github.com/pi-hole/pi-hole/#one-step-automated-install)
I picked the default options. After install, we need to change the system resolver to point at your PiHole. To do this for Ubuntu, edit your /etc/netplan/50-cloud-init.yaml file by running:
nano /etc/netplan/50-cloud-init.yaml
Edit the file underneath the eth0 interface (or another interface if appropriate) and then change the nameservers: addresses: section to read as such:
nameservers:
            addresses:
            - 127.0.0.1
Run netplan generate && netplan apply && reboot to apply the new DNS resolver.
Install WireGuard
Now, your PiHole is listening on the open internet. This is extremly unsecure so let’s protect it behind a VPN.
Install WireGuard using this command:
wget https://git.io/wireguard -O wireguard-install.sh && bash wireguard-install.sh
This command is using this wonderful script written by Nyr. This will setup WireGuard and will provide an easy-to-use script for adding new devices to your server.
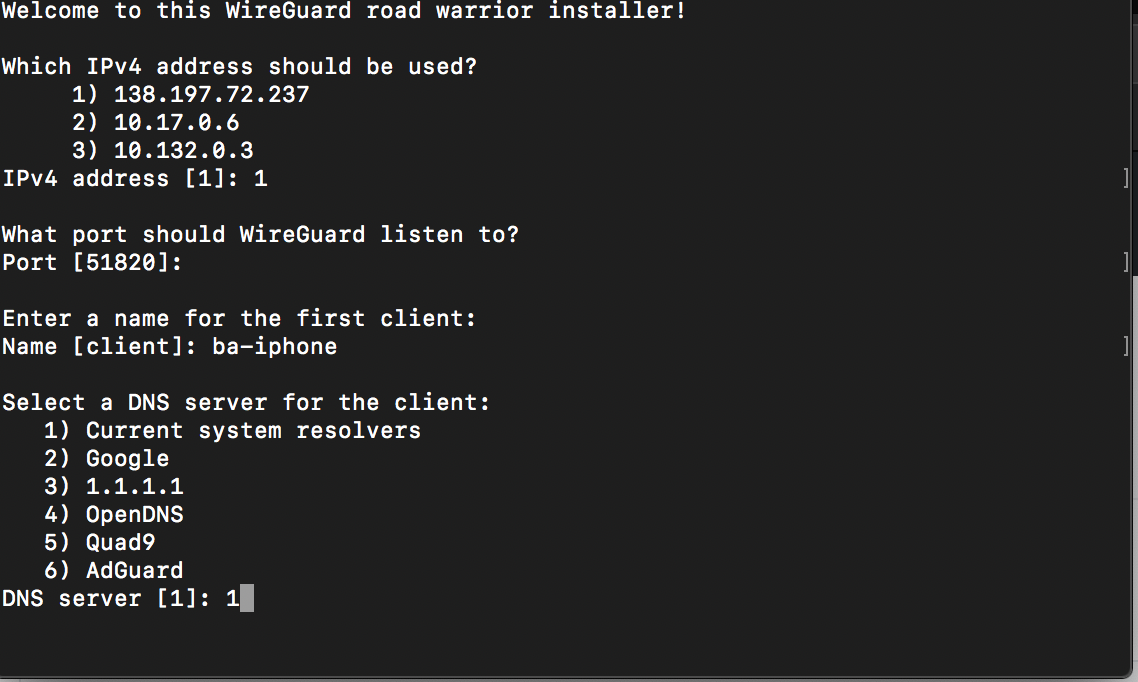
It will ask you which IPv4 address it should use - pick the one that is not a private address. On both servers that I have setup recently, it is the first option. It will then ask for the port - I allowed it to use the default, 51820. Then, it will ask for a first client name - I’m using ba-iphone, but it is up to you. For the DNS resolver, use the Current System Resolvers, which should be the default choice.
Anytime you add a client with this script, including upon first run, it will generate both a QR code and a config file. You can scan the QR code with the official WireGuard app - this will add all of the values from the .conf file.
Correct DNS Entry
We need to correct the DNS entries that WireGuard has loaded into the config file. I have submitted a PR to have an option added for this - but for now, we will have to edit this every time a new client is added.
If you loaded the VPN config via the QR code, go into your WireGuard app, and edit the DNS Servers option to have a value of 10.7.0.1. If you are using the .conf file to load, edit the line DNS = and so that it shows DNS = 10.7.0.1 before loading the file onto a device.
Hide PiHole behind WireGuard
Now that we have installed WireGuard and added a client, we need to configure PiHole so that it only will be available on devices connected to the VPN.
Run pihole -r and choose “Reconfigure”. Change the Interface to wg0. Press enter for default settings after.
Now your PiHole DNS resolver is only accessible via your WireGuard interface! But the admin page is accessible via the public IP address. Edit the lighttpd external.conf file by running nano /etc/lighttpd/external.conf and inserting server.bind = "10.7.0.1". Save this file, and run reboot to ensure every necessary service is restarted.
Test this configuration out my trying to access the PiHole admin console at http://[yourIP]/admin - you should receive no response. Connect to your WireGuard tunnel and go to http://10.7.0.1/admin - you should be able to access it now!